[SP201x] Implementing Kerberos delegation in SharePoint
Kerberos is often perceived as painful to setup and hard to debug. And to be honest: in my opinion it’s not one of the most user friendly techniques out there. But once you get the hang of it, the bigger picture start becoming clear and things get easier. In this article I will explain how to use Kerberos in combination with Business Connectivity Services (BCS) to delegate a users’ credentials to SQL Server. So let’s get to it!
An example case
Let’s start with a short case description for some context. Suppose you’re contacted by a business user, John, who wants to surface data from a SQL server database in SharePoint. The data in the database is of sensitive nature. Based on the logged on user, John wants the solution to filter the records so only the appropriate ones are shown. So there is a need for an additional layer of security, to make sure the correct data is visible for each user.
There are some routes you may consider:
- Create a web service which queries the database and adds a layer of security to make sure the user only sees the appropriate data. Connect your BCS entities to this web service, instead of directly to SQL.
- Create views within SQL which use the current logged on user to pre-filter the table and return only relevant data. This is sometimes referred to as view-time security.
- Use reporting services to create a report which filters data based on the current user.
The real creative thinkers amongst you might think of more ways to do the same, but that’s not the point here. The point is that SharePoint is not going to magically filter the data, so you need to make arrangements to make sure that your security requirements are met. And for that, you will need to be able to know which user is requesting the data, no matter which solution you choose.
Kerberos authentication, the basics
As the name implies, Kerberos will help us with authenticating the user. It’s important to understand that authentication is not the same as authorization. Authentication will help you to identify the user, making sure their identity is validated. Authorizing is the process of granting a user access to resources, based on that same identity. I will not go into the details of authentication; it suffices to know that Kerberos implements a way of checking your credentials to validate your identity. In Microsoft Active Directory environments, Kerberos or NTLM is used as authentication method, where Kerberos is the more secure one.
In the mentioned case, our user’s identity will be used in several places:
- First, SharePoint will authenticate the user.
- It will then use the user’s identity to check if he / she is authorized (there’s the difference!) to view the page, the BCS entity, etc.
- Now, assuming our user is authorized, BCS is going to query the SQL database to get the actual data. SQL is going to ask for credentials as well. That is where delegation comes in.
- SharePoint delegate your credentials to SQL, who will authenticate
Why Kerberos?
When you search for the combination of SharePoint and Kerberos online, you will find a lot of people having problems with it (myself included by the way). Based on that, you might ask: why should I use Kerberos at all? Well for starters, your domain admins might have specified it’s required. Secondly, NTLM doesn’t support double hop authentication. Double hop means your credentials are passed on to a second service / server, like we’re doing in this case. Lastly and arguably the most important reason: it’s the most secure over NTLM. So, Kerberos it is…
Step 1: SPNs
To be able to use Kerberos, the service using it should be registered in Active Directory. This is done using a service principal name (SPN). To register an SPN, we need some detail on the service which will be using Kerberos as an authentication provider.
- Which service you’ll be using. When you initially enabled Kerberos for SharePoint, you used HTTP as the service type. Since we’re enabling SQL Server to use Kerberos, we use: MSSQLSvc
- The fully qualified domain name (FQDN) of the SQL server: sqlserver.contoso.com
- The port your server is using, or in case of a named instance: the named instance itself. 1433 (default)
- SP (named instance)
- The service account which is used to run the SQL service: CONTOSO\sqlserver_svc
We use these parameters as input for the setspn command, as follows:
setspn –A MSSQLSvc/sqlserver.contoso.com:1433 CONTOSO\sqlserver_svc

setspn –A MSSQLSvc/sqlserver.contoso.com:SP CONTOSO\sqlserver_svc
The setspn command should be executed by a domain admin. When the details are correct, this will register the SPN in AD.
TIP! Ask your DBA for these details. And should he / she not know (or there is no DBA…): Microsoft has a tool which finds out for you. It’s called “Microsoft Kerberos Configuration Manager for SQL Server”. With this tool, you can easily check if your configuration is OK and it can also generate the script to generate the correct SPNs when needed. This way you have to worry less about the correct ports and named instances.
Figure 1: The Kerberos Configuration Manager shows missing SPNs and allows to generate a script for SPN creation.
Note: when you’re running SQL 2012 AlwaysOn, you will need to register SPNs for all of the servers in your availability group. You do not have to register SPNs for your listener or aliases. Use the Kerberos Configuration Manager to find out exactly what you need to register.
Step 2: delegation
Setting the SPNs will not yet have enabled the double-hop scenario. We now need to tell Active Directory that our SharePoint application pool accounts are allowed to delegate credentials to the previously added SPNs.
To do so, open up the Active Directory Users and Computers tool and find the account used for the SharePoint application pool. Note that this is the application pool which serves the site in which you want to use the external content type (ECT). When you’re going to use it in multiple web applications, you might have to do these steps for multiple accounts as well.
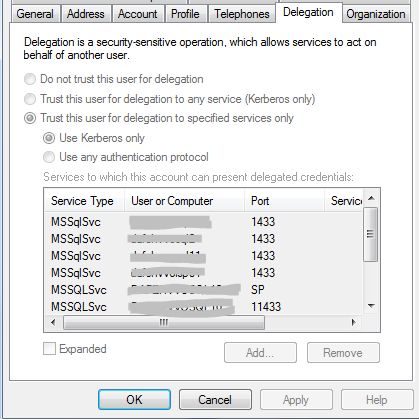
Figure 2: the Delegation tab shows to which SPNs this account is allowed to delegate credentials.
On the Delegation tab (Figure 2), you will find all of the SPNs to which this account is allowed to delegate. Of course you could also select “Trust this user for delegation to any service (Kerberos only)”, which would be the easier, but less safe option. To add an SPN, click “Add” and search for your SQL Server service account (NOT the server itself). You will now find all SPNs (servers) registered for that particular service account; select the ones you need to enable delegation for. At this time, Kerberos will now allow delegation of user credentials by the SharePoint application pool, to the SQL server hosting the database.
Step 3: Configuring ECT for delegation
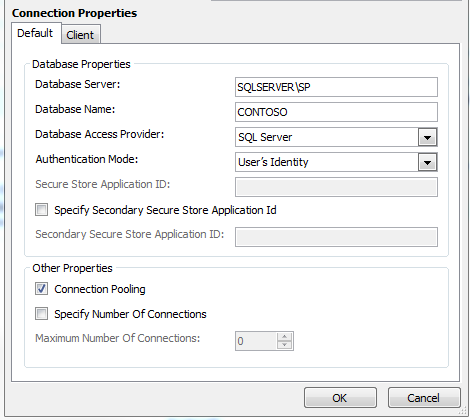
When you create an External Content Type (ECT), the connection properties (figure 1) have an “Authentication Mode” property. Here, we can choose between the following values:
- User’s Identity
- BCS Identity
- Impersonate Windows Identity
- Impersonate Custom Identity
The two impersonate options use a credential which is stored in the secure store and identified with a secure store application ID. This will usually be a service account stored in Active Directory, or a SQL account. The “BCS Identity” option uses the application pool account. This option is disabled by default and in most cases you should leave it that way. Reusing such an account for multiple purposes adds security risks and complicates your security scheme.
The first option is the one we’re interested in: using the User’sIdentity. This means BCS will connect to the SQL server by delegating (acting on behalf of) the currently logged on user. This way, we can use this information to filter data.
Figure 3: BCS connection properties
That’s it! You should now be able to create a new External List based on your previously created content type. When everything is configured, SharePoint now passes along the identity of the currently logged on user to SQL. You can check if your connections are using Kerberos by using the following SQL statement:
SELECT auth_scheme FROM sys.dm_exec_connections
And when you want to include the current user in your view, use the CURRENT_USER variable as such:
SELECT CURRENT_USER
Of course, these same steps apply to any service for which you want to enable Kerberos. Make sure you register the correct service type, server name and accounts; and you’re good to go!
Used sources / links
Identity delegation for Business Connectivity Services
http://technet.microsoft.com/en-us/library/gg502600(v=office.14).aspx
SharePoint 2010 and Kerberos
http://www.harbar.net/archive/2010/03/31/sharepoint-2010-and-kerberos.aspx
Authenticating to Your External System
http://blogs.msdn.com/b/bcs/archive/2010/03/12/authenticating-to-your-external-system.aspx
Setspn overview
http://technet.microsoft.com/nl-nl/library/cc773257(v=WS.10).aspx
Microsoft® Kerberos Configuration Manager for SQL Server®
http://www.microsoft.com/en-us/download/details.aspx?id=39046
Update; this is also a very good read on the subject: http://www.itunity.com/article/sharepoint-2010-2013-kerberos-unconstrained-constrained-delegation-533.


Leave a Comment