[IoT] My steps to an aquarium monitor (index)
Happy new year everyone! A new year, time for some new things! Somewhere back in 2015 I decided to buy a couple of Raspberry Pi’s, two Arduino nano devices and some other IoT stuff (sensors, cables, etc). The goal I have is to build a device which can monitor my fish tank, keeping track of things like temperature and pH value of the water. Now to be clear; there are already some very sophisticated projects out there which do exactly this and more. But I wanted to do it myself to have a better understanding of IoT technology and how it can be used. Now that Microsoft released Windows 10 IoT, I thought this would be an awesome opportunity to get me going on my existing C# skill set. I’ll be keeping track of my progress in a few blogs. I’m not quite sure where this will end yet, guess we’ll find out over the next months 🙂
Blog series index
Here are the links to all of the articles in this series:
- [IoT] Aquarium monitor; hardware wiring
- [IoT] Aquarium monitor; Raspberry & Azure IoT hub
- [IoT] Aquarium monitor; Azure Stream Analytics
- [IoT] Aquarium monitor; WebAPI for mobile use
- [IoT] Aquarium monitor; mobile app, Cordova style
- [IoT] Aquarium monitor; the Azure notification hub
- [IoT] Replacing webjob with Azure function
-
[IoT] Aquarium monitor; Sending commands back to your hardware
That’s my tank by the way. At this point not yet loaded with sensors and IoT stuff 😉
The hardware
First let’s talk shortly about what we’re trying to achieve here. I’ve got the following sensors lined up which I would like to read out:
- 2 temperature sensors (DS18B20 onewire) to monitor water temperature
- 1 humidity sensor
- 1 pH sensor
And I want to use a 4 channel relay board to be able to easily switch devices like pump, heater and lights on and off.
Eventually this should all be controlled using a mobile phone app. That should display the sensor outputs, monitor connection to the tank, alert in case of possible leaks and have a “maintenance mode” switch in order to easily switch off power when performing maintenance on the tank. Of course there are tons of other features we can think of, but this seems like a reasonable start.

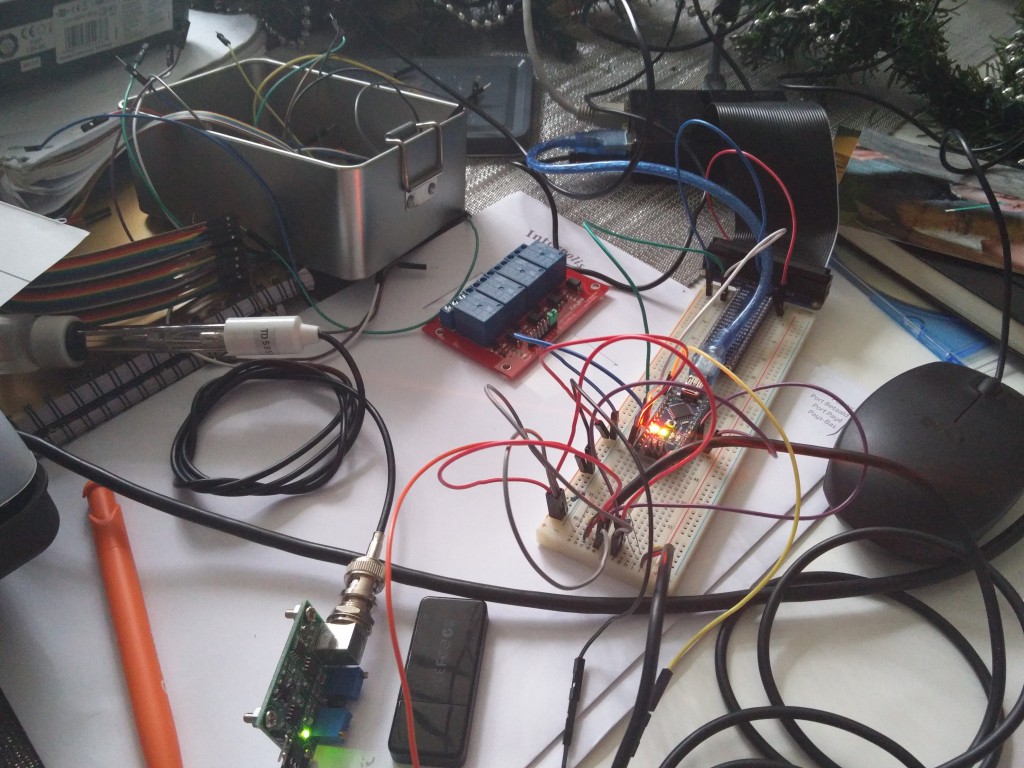
Part of the set-up in test phase. Gotta love going back to PCB’s, resistors and cables 🙂
The software
As said, the main technology used will be a Raspberry Pi 2 running Windows 10 IoT. Linked to the Raspberry I will use an Arduino nano primarily to read out the analog sensor values. You’ll find out quickly that although Raspberry is a very powerful and versatile platform, it doesn’t have proper support for (realtime) reading of analog sensor inputs. Arduino does this perfectly and using the I2C protocol you can make the two chat with each other in order to exchange messages. I’ll discuss this in more detail in a future post.
Having that in place, the Raspberry will then take care of uploading the captured data to an Azure IoT hub. This technology is still in preview and is meant for bulk uploading IoT data into the Azure cloud. A combination of other Azure products like stream analytics, DocumentDB and event hubs will then be used to process this data, store it, act on it, and so on. Again, too much detail so this willl be a separate future post (reminder to self: create an index in this post too).
The goal
The following diagram taken from here displays this set-up which I got from the Azure IoT suite “remote monitoring” sample, which is a sample solution that basically does the things I want it to do too. I’ll be setting up my own system based on this architecture, why invent the wheel twice, right?
These blogs hopefully will help others trying to do similar things. I quickly found out that although there is a lot of documentation available, it takes some time until you can really put all of the pieces in the puzzle in the correct place. As you can see there are quite some moving parts and as usual, error messages are not always as descriptive as you would like. So even if no one finds this interesting, it’s still good to have some things documented for myself 🙂
Ok, enough talk… onto post 2 with some more details on the hardware side of things.


January 4, 2016 at 9:30 pm |
[…] there! This is post #2 in my Aquarium monitor series. In this post, I’ll explain how I wired the different sensors to my Raspberry Pi and Arduino […]
January 5, 2016 at 7:57 pm |
[…] there! This is post #3 in my Aquarium monitor series. In the previous post I showed how I linked some sensors to my Arduino Nano and coupled that with a […]
January 9, 2016 at 4:34 pm |
[…] progressing well in my quest to create an Azure connected aquarium monitor! This is post #4 in my blog series about the subject. In the previous post we ended up sending messages with measurements to an Azure […]
February 11, 2016 at 6:51 pm |
[…] is post #5 in my blog series about the subject. In the previous post I explained how Azure stream analytics processes all of […]
March 14, 2016 at 9:32 am |
[…] Post #6 in my blog series on building an aquarium monitor solution using Azure! In my last post we created a Web API […]
May 13, 2016 at 4:50 pm |
[…] this blog post I will not be adding any new functionality to my aquarium monitor project. Instead, I’m going to replace already existing functionality. Not because that’s […]
August 21, 2016 at 1:30 pm |
Hi Jasper,
Great project i’m going to following this topic for sure 😉
I have some questions :
– are you going to add light controls like sunrise and sunset functions ?
– do you use LED’s for your Tank ?
Good luck and when I have all the Hardware I will try to make this setup and try to help where I can.
Greetings,
Ernst
August 22, 2016 at 7:02 pm |
Hi Ernst, thanks for the interest! To answer your question: a light module isn’t currently available but is definitely on the backlog. I am using LED’s myself with a simple multichannel controller which allows you to program your own sequences. I’ve got 2 channels for white (warm / cold) LED and 3 for RGB. Sunset / sunrise is easy to program like this, using the RGB to blend in color. For submerged, a lighting module would be very similar to this; allowing you to program n-channels in 24-hour sequences. I haven’t done any research yet, there might be ready made components / devices out there that support an interface for programnming. If those exist, it would be pretty easy to add it to submerged. Should you have any tips in this area, let me know! And should you want any help setting up the hardware, let me know and I’ll get in touch.