Installing a windows service with Visual Studio 2012
Since Visual Studio 2012, the default installer project was switched for a limited edition of InstallShield. I won’t get into the discussion whether this was a step forward or backward, but it’s there.
When you’re building an installer for Windows Service, you might get stuck in the situation where the installer is deploying your files onto the filesystem, but the actual service isn’t appearing in the services console. That’s because the installer class didn’t get called to register the service. For those of you who don’t know; you need to add an installer class to your service which registers it with Windows (you can easily do so by right clicking the service and choosing “Add installer”.
Anyways. If this is the case, go to “Files” in step 2 of the installer and open it up. Right click your project and open up the properties window. Go to the second tab “COM & .NET Settings”.
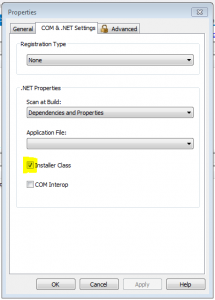
There, you’ll find a checkbox “Installer Class” which you need to enable. Now compile your installer again and there you go: it’ll register your service in Windows again.

January 25, 2016 at 12:24 pm |
We have to right click the exe file from the install shield wizard and click the properties and the remaining is same.