WCF service using Azure relay and ADFS authentication (1/2)
What I’m going to write about in this two-part article is what could be considered quite a common scenario. Your company wants to expose data to its employees outside of the internal network. Take a mobile app (or Windows 8 app) for instance, which gets its data from a legacy back-end system. In “old fashioned” scenario’s, you could:
- Create a WCF webservice to host the data.
- Deploy the webservice into some kind of secured network zone (DMZ).
- Kindly ask the firewall admins to open up a port to your service.
- Register a DNS address which makes it easier to call your service.
- Request SSL certificates and secure your service so only encrypted data is sent.
In this article, I’ll write about how Azure can make your life easier by handling some of these things in a different way. You, as a reader, should be familiar with WCF and have a basic understanding of authentication schemes. Some knowledge of what ADFS is would be handy too.
There’s two Azure topics I want to talk about: relay and ACS. In the first part of this article, we’ll talk about relay. How to setup ACS with ADFS will be topic of the second part.
Setting up the service bus in Azure
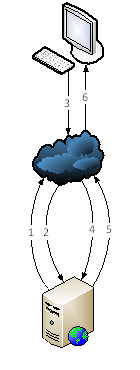 Relay is a technique which enables you to register your WCF service with Azure. Once registered, clients are able to call Azure instead of your service directly. And because the service initiates the communication, you only need access to the Internet, not from it. In Azure, this is handled by the service bus, which is a multifunctional messaging system. Relay is only a part of the functionality.
Here’s what happens in general:
- The service registers itself with Azure .
- Azure acknowledges the registration. The connection is kept open for future use.
- A client now connects to the endpoint registered with Azure and sends a webservice request.
- The request is relayed to the local WCF service.
- The result is passed back to Azure.
- The service bus passes the result to the client.
For you as a developer, this has some advantages:
- The call to Azure is https secured, so all data going to Azure is always encrypted. No need to purchase an SSL certificate.
- Same goes for data going to the client, encrypted as well.
- No need to open up any firewall ports. Default internet access is enough to make this work
- Although I haven’t thoroughly tested this, it should work in all kinds of proxy-enabled scenario’s too.
Ok, cool. So what do you need to make this work? To begin with, you’ll need a Windows Azure account. Open up the management portal (https://manage.windowsazure.com/) and go to the “service bus” section. Click “Create” and choose a namespace for your service bus instance:
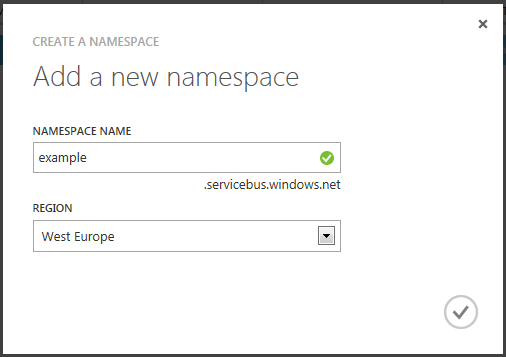
You can request the access key once you created the service bus instance. This key is used to authenticate server / client with the service bus. In part 2, we’re going to use ACS / ADFS for that, in which case the shared secret access key is irrelevant.
Creating a relayed WCF service
Once you’ve got your service bus namespace setup, it’s time to create a service. Most easy way is to create a console application which will use a ServiceHost object to self-host the service. The most important thing here are the bindings. You will have to use two bindings:
- One normal binding (like BasicHttpBinding) which hosts the service in a normal way, for instance on http://localhost:1234.
- A matching relay binding (in this case BasicHttpRelayBinding) which is used to connect to Azure and relay the service.
Assuming some WCF knowledge, creating a service host should be easy:
ServiceHost serviceHost = new ServiceHost(typeof(CalculatorAPI), new Uri(serviceEndpoint));
Registering the endpoints and bindings:
serviceHost.AddServiceEndpoint(
  typeof(ICalculatorAPI), new
  BasicHttpBinding(), "/"
);

serviceHost.AddServiceEndpoint(
    typeof(ICalculatorAPI), new BasicHttpRelayBinding(
        EndToEndBasicHttpSecurityMode.None,
        RelayClientAuthenticationType.None),
    ServiceBusEnvironment.CreateServiceUri("https", "calculator", "api"))
    .Behaviors.Add(new TransportClientEndpointBehavior
    {
        TokenProvider = TokenProvider.CreateSharedSecretTokenProvider("owner", "<<azure_access_key>>")
    });
The things to notice:
- The bindings need to match. So use a BasicHttpRelayBinding in combination with a BasicHttpBinding and not a WsHttpBinding for instance.
- Both endpoints register the same interface class, so both endpoints know which methods your service will provide.
- For the relay binding, you specify the service bus address with the help of the CreateServiceUri method. This asks for a scheme, the namespace you created earlier and a service path which can be anything you like.
In the example for part 2 (ADFS), we’ll switch from using a SharedSecretTokenProvider to a SamlTokenProvider used with SAML tokens.
Basically, that’s all you need to do on the server side. Simple, right? You could create one extra endpoint to provide a mex metadata exchange binding. The code to do that:
// Check to see if the service host already has a ServiceMetadataBehavior
ServiceMetadataBehavior smb = serviceHost.Description.Behaviors.Find<ServiceMetadataBehavior>();

// If not, add one
if (smb == null)
  smb = new ServiceMetadataBehavior();

smb.HttpGetEnabled = true;
smb.MetadataExporter.PolicyVersion = PolicyVersion.Policy15;
serviceHost.Description.Behaviors.Add(smb);

// Add MEX endpoint
serviceHost.AddServiceEndpoint(
    ServiceMetadataBehavior.MexContractName,
    MetadataExchangeBindings.CreateMexHttpBinding(),
    serviceAddress + "/mex"
);
I would advise to use the mex endpoint only in development environments and leave it out for production. But that’s up to you, it doesn’t really matter that much.
Add a serviceHost.Open(), run your console app and see if it properly registers itself with Azure. Once it does, you should be able to create a client and connect with it.
Creating a client to match
Creating a client follows the same principles. The client counterpart of a ServiceHost is the ChannelFactory. Because it shares the interface definition, it’s wise to keep that class in a shared library. But you could also make use of the local endpoint and the “Add Service Reference” functionality of Visual Studio, which will generate an interface class for you. As long as the interface class has the same methods and signatures as your service has, you’re good.
var cf = new ChannelFactory<ICalculatorAPIChannel>(
    new BasicHttpRelayBinding(),
    new EndpointAddress(ServiceBusEnvironment.CreateServiceUri("https", "calculator", "api")));
Now, as we did with the service, we need to specify the endpoint behaviour:
cf.Endpoint.Behaviors.Add(
    new TransportClientEndpointBehavior {
        TokenProvider = TokenProvider.CreateSharedSecretTokenProvider("owner", "<<azure_access_key>>")
    });
And with that setup, you can simply create a channel and call the method of choice!
using (var ch = cf.CreateChannel())
{
    var answer = ch.Add(10, 6);
    Console.WriteLine("Answer: {0}", answer);
}
So the cool thing is, apart from some configuration and setup, it’s really not that hard to setup a relayed service. In my opinion, this is far less complicated than convincing the firewall guys to open up ports for you 😉
This service is secure. All the communications are encrypted via SSL and both client and server need to know the shared access key to be able to connect to the service bus. But this method of authentication is pretty limited and not really usable in mobile apps scenario’s (how do you prevent some unauthorized user from using the app?). So in the follow-up of this article I will explain how to extend the sample with ADFS integrated authentication. That article will also contain a full code sample.
Update: and here’s part two.

Leave a Comment