[IoT] Aquarium monitor; the Azure notification hub
Hey there! Welcome back again to post #7 in my Internet of Things aquarium monitor series. In this series I’m explaining how to use Windows 10 IoT and Azure to read out sensor data, process it and act on it. And that “act on it” part is what we’ll take a look at in this post!
Ok, first we’ll need to think about the components that we’ll need to do this. Let’s take it step by step:
- Data. We’ve got our data coming in to the IoT hub (detailed in this post).
- Reference data. Second, we need reference data. This is the data that we’ll compare our incoming data to to determine whether things are going wrong. So for instance, when we want an alert when temperature drops below 20 degrees Celcius, then 20 would be our reference point.
- Processing logic. Once we’ve established that our data triggers the need to send out a notification, we need some logic to actually go and do this.
- Receiver. Of course we need some device to receive our notifications. Since we did a Cordova mobile app in my previous post, makes sense to use that as an endpoint.
Now instead of beginning with number 1, I’m going to switch things around and start with the receiving end.
Setting up an Azure notification hub
So how are we going to send notifications to our Cordova app? Well luckily, Azure has another trick up it’s sleeve and this one is called a Notification Hub.
Open up your Azure portal and head over to the “Notification Hubs” option. Simply click “Add”, choose a name, location, subscription, etc. to create a new hub instance. Once created, you’ll see the option to configure push notification services. This is the clever part of the notification hub.

Where you would normally need to handle all of these services separately, Azure will now take care of this. For my purpose I only configured the Google service since I’m using an Android phone to run my Cordova app. Instructions on how to configure this are found here.
Once you’ve obtained your API key from Google, you can now enter that key in the notification hub, and that’s simply all you need to go to configure the hub.
Final step to configure Azure is done by heading over to your App Service instance hosting your API. Take a look at the Settings pane and find the Push option. You will now configure your API to use the newly created Notification Hub.
Preparing our app for notifications
Now that we’ve got the hub set-up, we need to go ahead and prepare our Cordova app to handle notifications. First, you need to make sure you’ve got the Notification plugin installed in your Cordova project. This plugin will provide the abstraction layer between the OS notification functionality and the Cordova app so you can also use notifications on iOS and Windows Phone when you want to.
Also, you’ll need to have the Google Play services installed using the Android SDK manager for this to work if you’re using the emulator (not required when you’re deploying to a physical device). Detailed instructions are found in this article (same as the above).
Next, you need some code:
var pushRegistration = null;
var registrationId = null;

var initPushRegistration = function () {
    console.log("Initializing push notifications");

    pushRegistration = PushNotification.init({
        android: {
            senderID: shared.apiInfo.gcmSenderID,
            ecb: "onGcmNotification"
        },
        ios: {
            alert: 'true',
            badge: 'true',
            sound: 'true'
        },
        wns: {

        }
    });

    pushRegistration.on('registration', function (data) {
        registrationId = data.registrationId;
        registerPush();
    })

    pushRegistration.on('notification', function (data, d2) {
        if (data && data.message && data.message.length > 0)
        {
            alert(data.message);
        }
    });

    pushRegistration.on('error', function (err) {
        console.log('Push registration returned an error: ' + err);
    });
}

var registerPush = function () {
    console.log("Registering device for push notifications: " + registrationId);
    if (registrationId.length > 0) {
        console.log("gcm id " + registrationId);
        if (mobileServiceClient) {
            console.log("registering with Azure for GCM notifications");
            mobileServiceClient.push.register('gcm', registrationId, null, null, registrationCallback);
        }
    }
}

var unregisterPush = function () {
    console.log("unregistering for push messages");
    mobileServiceClient.push.unregister('gcm', registrationId);
}

function registrationCallback() {
    console.log("registrationCallback called.");
}
Ok so let’s break it down a bit:
- First, the senderID needs to be configured. You find this by opening the Google Developers Console and clicking your configured project (you should have one from the previous step). On the projects page, the number is listed in the top-left box after “ID“. Copy just the number, not the hash sign in front of it.
- The initPushRegistration method is what you need to call to initialize the app for push messages. This will hook some event handlers and call the push registration methods. Once the registration is done, the handler will then call the next function, which is…
- The registerPush method. This one will call-out to our Azure hosted API with the newly found registration ID. Note how it uses the mobileServiceClient object we also use to communicate with the API endpoints. Azure will now register your device for push notifications.
I placed this code inside of the mobile client Angular service I already had. I’m not yet sure on how long this registration persists, so I chose to (re)register the device after every login. Note to self: need to refactor this stuff to get it right.
That’s it! On the client side these are all the things you need to get going. Once you’ve got this implemented, you can use the test option in Azure to send out a test notification. When you’ve got everything right; your phone should now display a notification 🙂 If it doesn’t, use chrome://inspect again and debug the registration process, there’s probably something going wrong there. I also found that sometimes there can be a little delay in Azure between hitting the button and actually receiving the notification.
Reference data + stream analytics
Back to the server side of things. We’ll now take a look at generating the notifications. For this we’ll start with storing the reference data. Back in this post we set-up a Stream Analytics job to write data to Azure blob storage. For the reference data, we’ll also be using blob storage which will store our reference data in JSON format.
To store the reference data, create a new container called “devicerules” in your blob storage account.

To store the data, we’ll use a similar structure as used for the telemetry data. The first level of folders represent the date (2016-03-16), the next level the hour (21). Inside of the folder, the rules are stored as devicerules.json with contents similar to this:
[{"DeviceId":"repsaj-win10pi","Temperature1Min":22.0,"Temperature1Max":28.0,"Temperature2Min":15.0,"Temperature2Max":30.0,"pHMin":null,"pHMax":null}]
You should regard this as one record, containing the rules for a single device (in this case: “repsaj-win10pi”). In my case, I’m monitoring based on minimum and maximum temperatures and pH value. Based on your use case you can use any thresholds you want as long as you can somehow compare the values to your incoming data.
I’m not going to share the code to get the file in blob storage as you can simply get that from the IoT Remote Monitoring sample (my own repository coming online soon). In essence, you create an object with the members as above, convert that to JSON and store it to blob storage.
Setting up a notification event hub
Hey wait a sec, didn’t we already create a notification hub before? We did, but this time we’ll be creating an event hub instance. We need this to receive incoming data from a new Stream Analytics job we’ll configure in the next section. We’ll be monitoring for events and then call the notification hub, since you probably don’t want an event being fired for every threshold violation (which in my case would be one every 30 seconds).
Once again in the Azure portal, head over to the Event hubs section. At time of writing, this means getting redirected to the old Azure portal experience as event hubs are not yet in the blade-style portal. Click Create and choose a name for your hub and the region is needs to run. Switch to basic when you don’t expect too many messages (less expensive!).

With the namespace set-up, now create the event hub itself inside of the namespace. I’ve called it eventhub-ruleout in this example.
With your event hub created, head over to the CONFIGURE section. There is a shared access policy called “RootManageSharedAccessKey” there, along with a primary and secondary key. You’ll need these (at least the primary key) for the next step.
Configuring Stream Analytics
Quick recap! We now have reference data and our stream data coming in. We’ve got an event hub for the receiving end. How to link those two together? Stream Analytics to the rescue again! We’ll be configuring a stream analytics job which monitors the incoming data and sends out data whenever a value crosses one of the thresholds.
Head over the stream analystics and create a new job. I’ve named it notifications. This job will have two inputs: one for the incoming stream data (IoTHubStream coming from the IoTHub, see previous post on how to configure) and one for the reference data. This one is of source type Reference Data and configured as follows:

Now on the other end, we’ll also set-up two outputs. One is meant to write all notification data to blob storage for future use. You might want to create reports of the alerts for instance. I’ll skip this one so this post doesn’t get too long. The real deal of course is our event hub, which is configured like this:

So you fill in the namespace and event hub name you’ve chosen. Then comes the RootManageShareAccessKey and the secret key you can get from the previous step. Azure will validate these things, so you shouldn’t be able to save wrong settings without being notified.
Last part is… the query! And this is a lengthy one:
WITH
	[Alerts]
AS (
SELECT Stream.deviceId,
     'temperature1' as ReadingType,
     Stream.temperature1 as Reading,
     CASE WHEN (Ref.Temperature1Min IS NOT null AND Stream.temperature1 < Ref.Temperature1Min) THEN Ref.Temperature1Min
     ELSE Ref.Temperature1Max END AS Threshold,
     Stream.EventEnqueuedUtcTime AS [Time]
FROM [IoTHubStream] Stream
JOIN [DeviceRulesBlob] Ref ON Stream.deviceId = Ref.DeviceId
WHERE
     (Ref.Temperature1Min IS NOT null AND Stream.temperature1 < Ref.Temperature1Min) OR
     (Ref.Temperature1Max IS NOT null AND Stream.temperature1 > Ref.Temperature1Max)

UNION ALL

SELECT Stream.deviceId,
     'temperature2' as ReadingType,
     Stream.temperature2 as Reading,
     CASE WHEN Ref.Temperature2Min IS NOT null AND Stream.temperature2 < Ref.Temperature2Min THEN Ref.Temperature2Min
     ELSE Ref.Temperature2Max END AS Threshold,
     Stream.EventEnqueuedUtcTime AS [Time]
FROM [IoTHubStream] Stream
JOIN [DeviceRulesBlob] Ref ON Stream.deviceId = Ref.DeviceId
WHERE
     (Ref.Temperature2Min IS NOT null AND Stream.temperature2 < Ref.Temperature2Min) OR
     (Ref.Temperature2Max IS NOT null AND Stream.temperature2 > Ref.Temperature2Max)

UNION ALL

SELECT Stream.deviceId,
     'pH' as ReadingType,
     Stream.pH as Reading,
     CASE WHEN (Ref.pHMin IS NOT null AND Stream.pH < Ref.pHMin) THEN Ref.pHMin
     ELSE Ref.pHMax END AS Threshold,
     Stream.EventEnqueuedUtcTime AS [Time]
FROM [IoTHubStream] Stream
JOIN [DeviceRulesBlob] Ref ON Stream.deviceId = Ref.DeviceId
WHERE
     (Ref.pHMin IS NOT null AND Stream.pH < Ref.pHMin) OR
     (Ref.pHMax IS NOT null AND Stream.pH > Ref.pHMax)

)

SELECT *
INTO [DeviceRulesMonitoring]
FROM [Alerts]

SELECT *
INTO [DeviceRulesHub]
FROM [Alerts]
As you can see, there are three blocks. They check temperature1, temperature2 and the pH value against the reference data. Then, all of the results are selected into DeviceRulesMonitoring (how I named the storage output) and DeviceRulesHub (how I named the event hub output).
If you want to do more checks, this becomes a problem because at the moment you can only use the Stream data three times in one query. Microsoft promises this is being looked at to get this limit boosted. You could also combine things into one query and use some more case / switch logic, but I prefer to keep it clean for now.
Checking whether the job really works is easy by monitoring the blob storage container in which the notification output should be written. If there’s output, you can be pretty certain that the event hub output is also receiving this data.
Last but not least: Azure WebJob
You might have figured out by now that there’s one missing piece. And that’s the link between the rule notifications on the event hub and our previously created notification hub. To link these two together, I’ve used an Azure WebJob. If you’re not familiar with web jobs, this is basically a simple console app running in the cloud.
You can create a new webjob project in Visual Studio, within the solution you already have. Visual Studio allows you to publish the job straight to Azure, so go ahead and do so to create the Azure instance of the webjob. This too will become an App Service, just as your API project is.
Important! Make sure Always On is selected in the Settings pane of your web job in Azure. When you do not have this enabled, Azure will kill your job after an amount of time which will mean you’ll stop getting notifications.
Inside of the webjob, some code will:
- Connect to the event hub
- Monitor for incoming messages
- Process these messages and send them out via the notification hub
First, make sure you have the following NuGet packages added to your project:
- Microsoft.Azure.NotificationHubs
- Microsoft.Azure.ServiceBus.EventProcessorHost
- Microsoft.Azure.Mobile.Server.Notifications
- WiindowsAzure.ServiceBus
Inspired by the remote monitoring solution, I’ve set-up my web job and will only discuss the meat & potatoes here. First we’ll create an EventProcessorHost to which we link a IEventProcessorFactory instance. The event processor host will connect to our event hub. The factory will then create an instance of the correct event processor class (which we define ourselves) based on the event received. This is a nice implementation cause it allows you to add more event processors when you decide to handle more types of events. For now we’ll stick to one.
_eventProcessorHost = new EventProcessorHost(
    Environment.MachineName,
    _configurationProvider.GetConfigurationSettingValue("eventHub.HubName").ToLowerInvariant(),
    EventHubConsumerGroup.DefaultGroupName,
    _configurationProvider.GetConfigurationSettingValue("eventHub.ConnectionString"),
    _configurationProvider.GetConfigurationSettingValue("eventHub.StorageConnectionString"));

_factory = new DeviceAdministrationProcessorFactory(_deviceLogic, _configurationProvider, _notificationProcessor);
Trace.TraceInformation("DeviceEventProcessor: Registering host...");
var options = new EventProcessorOptions();
options.ExceptionReceived += OptionsOnExceptionReceived;
await _eventProcessorHost.RegisterEventProcessorFactoryAsync(_factory);
Within the DeviceAdmininstrationProcessor Factory, we create our processor instance:
public IEventProcessor CreateEventProcessor(PartitionContext context)
{
    var processor = new DeviceAdministrationProcessor(_deviceLogic, _configurationProvider, _notificationProcessor);
    processor.ProcessorClosed += this.ProcessorOnProcessorClosed;
    this.eventProcessors.TryAdd(context.Lease.PartitionId, processor);
    return processor;
}
And within the DeviceAdministrationProcessor is where we’ll handle the actual events:
private async Task ProcessEventItem(dynamic eventData)
{
if (_throttleStopWatch.IsRunning && _throttleStopWatch.Elapsed.TotalHours < 1)
{
// when the stopwatch is running and we've not passed 60 minutes yet; prevent sending out another alert
return;
}
else if (_throttleStopWatch.IsRunning)
{
// if the stopwatch is running and we've passed 60 minutes; reset it to start over
_throttleStopWatch.Reset();
}
try
{
// try sending an alert
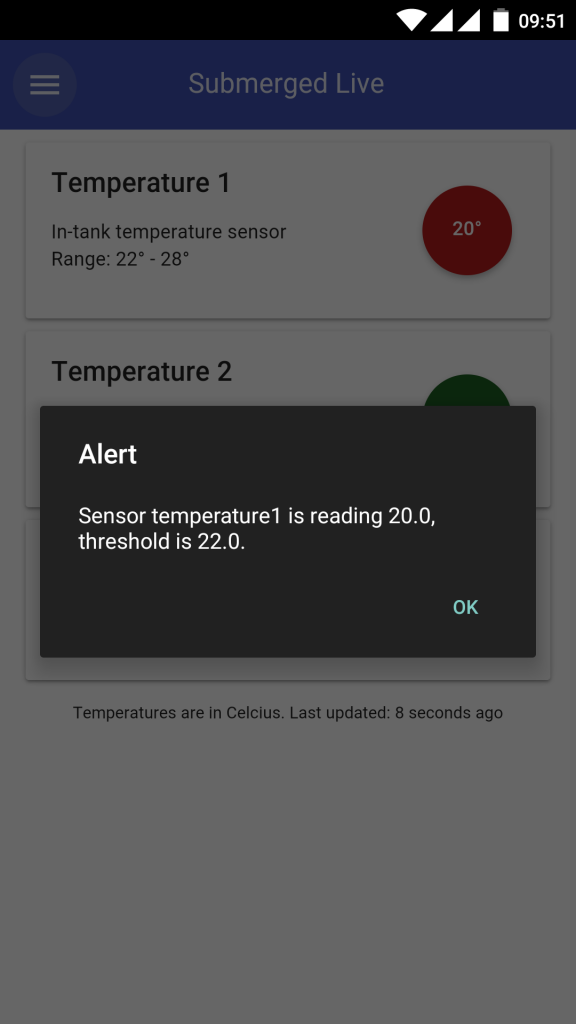
string notificationMessage = String.Format("Sensor {0} is reading {1:0.0}, threshold is {2:0.0}.", eventData.readingtype, eventData.reading, eventData.threshold);
await _notificationProcessor.SendNotificationAsync("Submeged Alert", notificationMessage);
// when the alert was sent; start the stopwatch to prevent new alerts within the hour
_throttleStopWatch.Start();
}
catch (Exception ex)
{
// ignore any errors for now
Trace.TraceError("Error during ProcessEventItem in DeviceAdministrationProcessor: " + ex.ToString());
}
}
Note a couple of things here. First, I wanted to prevent my phone from being bombed as soon as a sensor would be running out of bounds. I want to have a notification of course, but there’s little use in getting a new one every 30 seconds as long as the problem hasn’t been fixed. So what I did is use a timer to make sure that only one notification is sent out per hour.
Next, the notification is constructed in the form of a string and then passed off to the notification processor. I’ve done this so I can re-use that notification processor logic from multiple event processors.
public async Task SendNotificationAsync(string title, string message)
{
    string notificationHubConnection = _configuration.GetConfigurationSettingValue("MS_NotificationHubConnectionString");
    string notificationHubName = _configuration.GetConfigurationSettingValue("MS_NotificationHubName");

    // Create a new Notification Hub client.
    NotificationHubClient hub = NotificationHubClient.CreateClientFromConnectionString(notificationHubConnection, notificationHubName);

    // Construct the android notification payload
    dynamic androidNotificationPayload = new System.Dynamic.ExpandoObject();
    androidNotificationPayload.data = new System.Dynamic.ExpandoObject();
    androidNotificationPayload.data.title = title;
    androidNotificationPayload.data.message = message;

    // conver the payload to a string which we'll need to send
    string jsonPayload = Newtonsoft.Json.JsonConvert.SerializeObject(androidNotificationPayload);

    try
    {
        // Send the push notification and log the results.
        await hub.SendGcmNativeNotificationAsync(jsonPayload);
    }
    catch (System.Exception ex)
    {
        Trace.TraceError("Fault when sending notification: {0}", ex);
    }
}
The above is the most important method of the notification processor. As you can see, sending out a notification is easy. It involves creating a NotificationHubClient object, setting-up a payload and then handing over that payload to the hub. The two configuration settings (connection string and hub name) you can get from the Azure portal.
The result
Once the payload is delivered to the hub, it will take care of sending out the message to the registered devices. And if all parts of the puzzle work you should now receive notification messages on your mobile device as soon as one of the sensor values crosses the threshold you’ve got configured! I’ve found that sometimes there’s a small delay between sending and receiving the notification, but never more than a few seconds.
Awesome! In my next post, I’ll be looking at how to send commands back to the hardware side of things. In my case, I want to be able to switch relays on / off from my mobile app. This is handy when performing maintenance, as I can simply introduce a “maintenance mode” in which pumps, heat, co2 and lights are turned off without having to unplug things (running into the risk of forgetting to unplug / replug the heater, which is quit common for me). Stay tuned for that one!

April 13, 2016 at 9:05 am |
[…] [IoT] Aquarium monitor; the Azure notification hub […]
May 13, 2016 at 6:08 pm |
[…] you didn’t read it or do not recall, check out the post I wrote on how I implemented notifications. I made use of a webjob to monitor the event hub for incoming […]